No, I didn’t try to type MTV; I intended to say that Google is my MVT – Most Valuable Tool. We all love Google to look things up and find vendors, ideas or answers to strange questions (like what does a fox really say?). But I have found Gmail, Google Voice and Google Drive to be AMAZEBALLS during planning.
Other bloggers before me have sung the praises of Google and I am here to join the sweet symphony. Well, not really because none of you would want to hear me sing. If I could, my love for Google would sound something like Ariel around the 15 second mark. (Ignore Ursula, she scared me as a child)
Let’s start with Gmail. I created a Gmail specific to the wedding right after we were engaged. While I love Gmail’s filters for spam and promotions, I wanted to keep wedding emails separate from my personal account. I have found it super helpful to have less items to wade through if I’m trying to find a wedding email or an email to give to vendors.
Along with having my Gmail account, I set up a Google Voice number. If you aren’t familiar with Google Voice, familiarize yourself here. By creating a Google Voice number, I basically created a mask for my phone. I can still receive calls from vendors to my cell phone, along with texts, but once the wedding is over, I can remove the Google Voice number from my account and boom, no more calls from vendors or any solicitors. Perf McGerf.
And last but definitely not least, Google Drive. Out of the three, this is probably the top advantage to Google. I love that Google Drive is not only a free way to create documents, spreadsheets and forms, but it’s compatible across many platforms and is constantly up to date. Whether I am on my phone, iPad or computer, I can access my guest list, timeline or idea list virtually anywhere. Gone are the days where I need to worry about a file being on my home computer if I need to access it in a pinch at work. Adios to needing to constantly email myself the most recent version of something. Plus, I can easily share the documents with Mr. PB or anyone else who needs to access them.
Shortly after we were engaged, I created a tentative guest list on Google Drive to give me an idea of how many people we were looking at. I then used the same spreadsheet to compute potential food and drink costs for any venue we were interested in. This helped me realize immediately if a venue was out of our price range or if it was worth scheduling a meeting with.
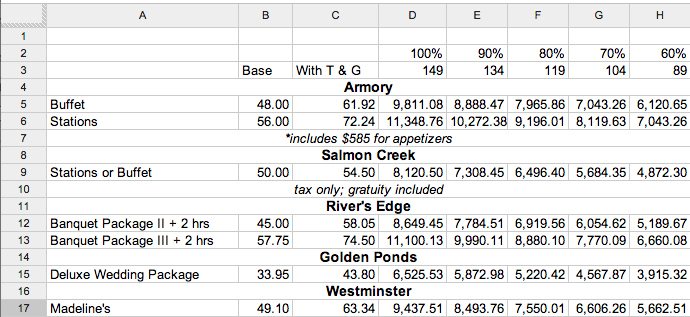
Screenshot of my Google Drive // Personal Photo
A quick breakdown of the spreadsheet and formulas:
Column A – Package Name
Column B – Base Price (before tax and gratuity)
Column C – Tax and Gratuity: SUM((Column B times .2), (Column B times .09), Column B)
For example, C5=SUM((B5*.2),(B5*.09),B5)
.2 is for 20% gratuity – 18% is pretty standard here but I again wanted to slightly overestimate
.09 is for 9% tax – it’s only 8% here but I wanted to slightly overestimate
*Note – I recommend separating them rather than just doing B5*1.29 so you can easily adjust if a venue doesn’t charge gratuity or tax changes.
Now that the spreadsheet is calculating the total price per person including tax and gratuity, I use that number to calculate the total overall cost. I already had the first tab of this specific spreadsheet calculating my total number of guests so I decided to have the two lists “talk” to keep the data accurate. For my guest count at 100%, cell D3=Lists!C1 (C1 in my first tab spreadsheet is the cell that holds my overall total). Then for each cell in row 3, I used =Lists!C1*.9, =Lists!C1*.8, =Lists!C1*.7 and =Lists!C1*.6 for 90, 80, 70 and 60 percent of guests.
So, now I have my per person cost and the number of guests and all that needs to be done is to multiply the two. For example, D12=SUM((C12*D3)). I just fill out the rest of the fields using the same idea, E12=SUM((C12*E3)), F12=SUM((C12*F3)), G12=SUM((C12*G3)) and H12=SUM((C12*H3)).
If I haven’t lost you yet, kudos to both of us! You may have noticed that I used double parentheses in the last step and they didn’t seem necessary. Well, I did that because some places there were extra things to pay for, like the Armory would have meant an extra $585 in appetizers. So, my formula for D5=SUM((C5*D3),585), which calculates the overall total plus $585.
While it takes some time to set up and get the formulas correct, this little spreadsheet was so helpful is comparing venues and making sure I was staying on track with my budget.
Do you love Google and its applications as much as I do? Anyone else out there going to take a stab at the spreadsheet I just explained?

 What a cool way to show off what we love and the beautiful ring. Mr. PB and I aren’t baseball fans though, so a football would be a better option. // Source: Cory Ryan Photography